Easy Narwhal Rocks: Your Complete Guide to Magical Rock Painting
Ever wondered how to paint a narwhal on a rock that looks absolutely magical? These mystical creatures make perfect subjects for rock art.
I’m about to share everything you need to know. Get ready for an enchanting journey into the world of narwhal rock painting!
What Are Narwhal Rocks?
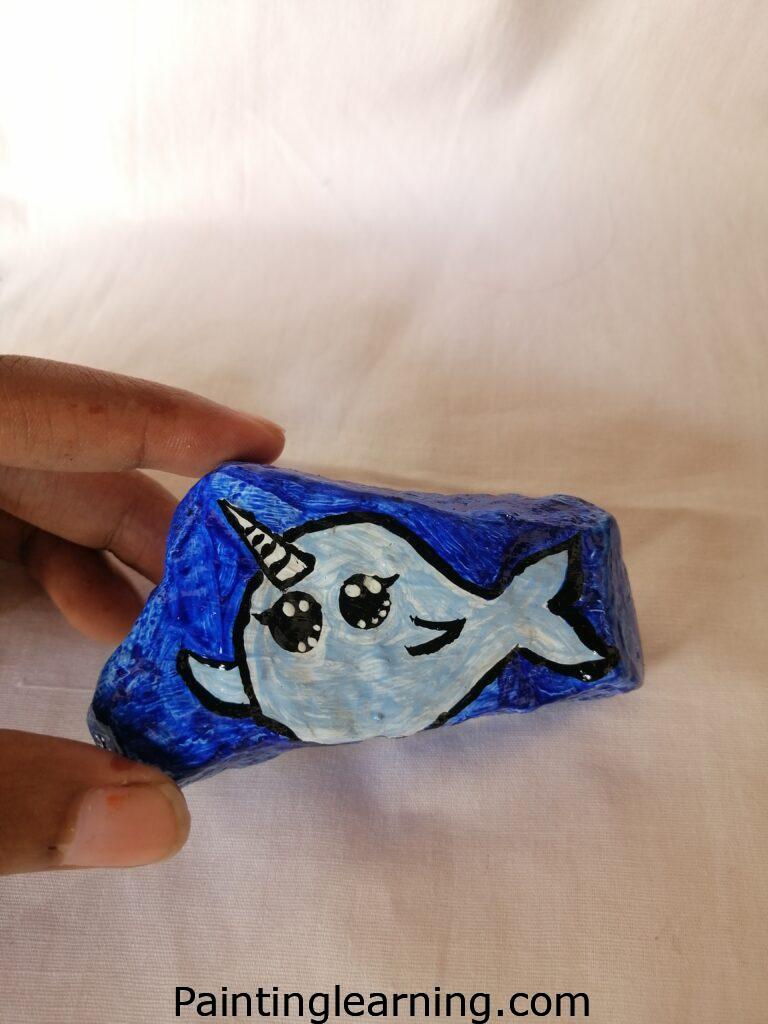
Narwhal rocks are painted stones that feature these incredible Arctic whales with their distinctive spiral tusks. I love creating these because they bring a touch of ocean magic to any space. The narwhal’s unique horn-like tusk makes it instantly recognizable and absolutely captivating when painted on smooth river rocks.
These painted rocks have become incredibly popular in the rock painting community. They’re perfect for beginners but detailed enough to challenge experienced artists. The best part? You can make them as simple or as elaborate as you want.
Arctic Whale : A marine mammal known for its long, spiral tusk
Rock Painting : The art of decorating stones with paint and designs
Acrylic Paint : Fast-drying paint perfect for outdoor crafts
Varnish Sealer : Protective coating that preserves painted artwork
Materials Needed
Here’s your complete shopping list for creating stunning narwhal rocks:
| Material | Type/Color | Purpose | Cost Range | Where to Buy |
|---|---|---|---|---|
| Rocks | Smooth, medium-sized | Base surface | Free-$5 | Rivers, beaches, craft stores |
| Acrylic Paint | White | Base coat | $2-4 | Any craft store |
| Acrylic Paint | Blue | Narwhal body | $2-4 | Any craft store |
| Acrylic Paint | Black | Details and outline | $2-4 | Any craft store |
| Flat Brush | 1/2 inch wide | Base painting | $3-8 | Craft stores |
| Detail Brush | Fine tip | Line work | $2-5 | Craft stores |
| Varnish | Clear, outdoor | Sealing | $5-10 | Hardware/craft stores |
| Paper Towels | Absorbent | Cleanup | $2-3 | Grocery stores |
| Water Container | Small jar | Brush cleaning | Free | Kitchen supplies |
Simple Narwhal Rocks Step by Step
Let me walk you through my proven process for creating these magical creatures:
Step 1: Prepare Your Base
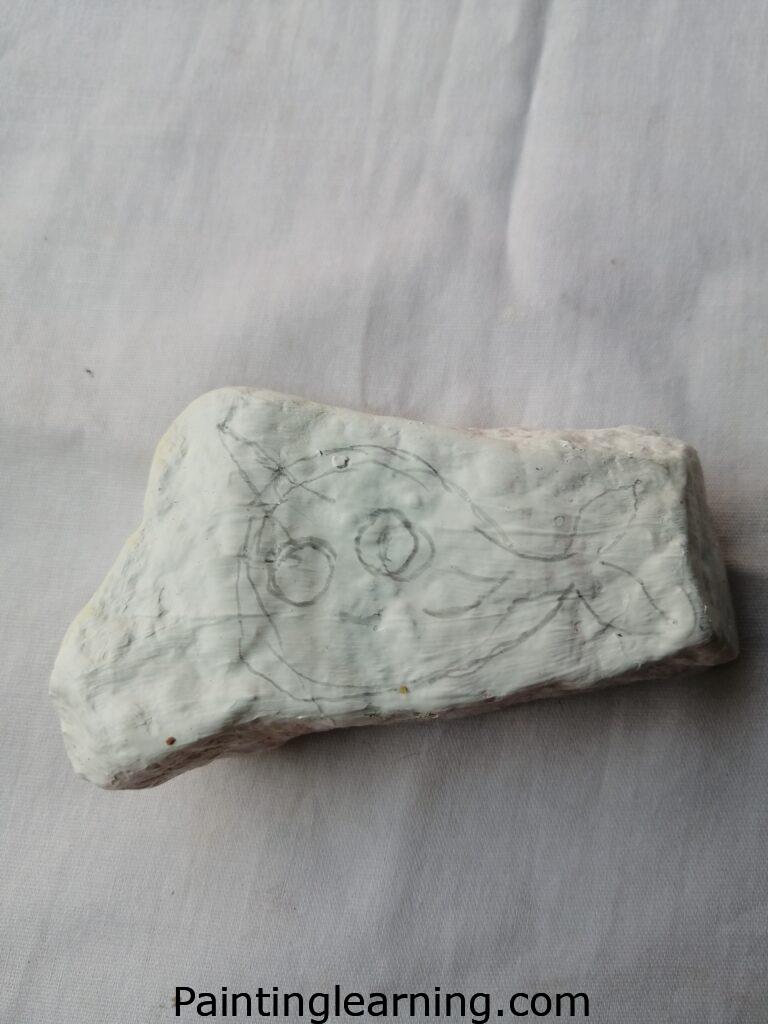
First, paint your rock with white acrylic paint and let it dry completely. This creates the perfect foundation for your narwhal. I always make sure to cover every surface evenly. The white base helps your colors pop and gives you a clean slate to work with.
Don’t rush this step! A good base coat makes all the difference in your final result.
Step 2: Add the Narwhal Body
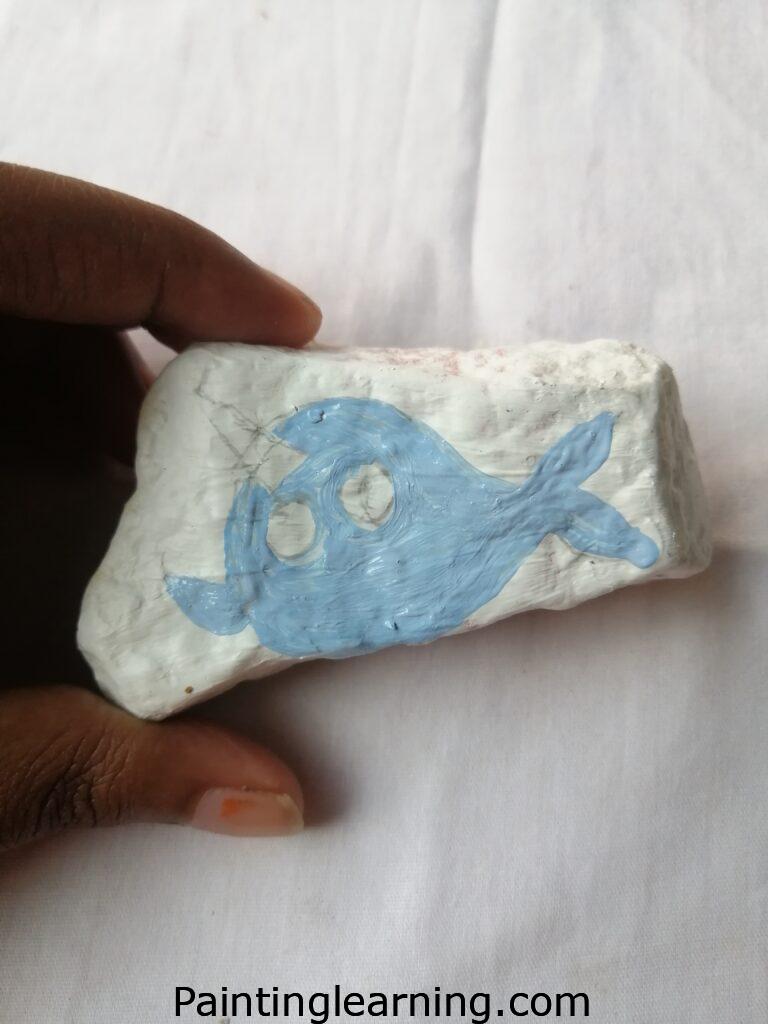
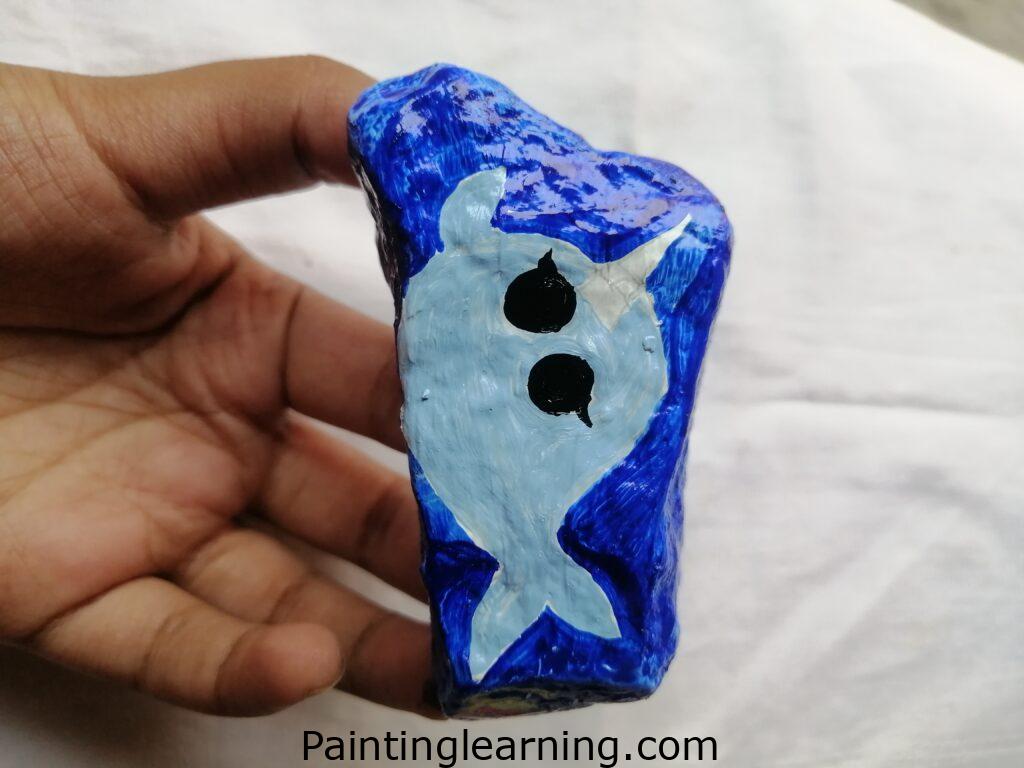
Now comes the fun part – painting your narwhal! Use blue acrylic paint to create the whale’s body shape. I like to start with a rounded body and gradually taper it toward the tail.
Picture a gentle curve that flows naturally across your rock. Let this dry completely before moving on. The blue should be rich and vibrant against your white base.
Step 3: Create the Details
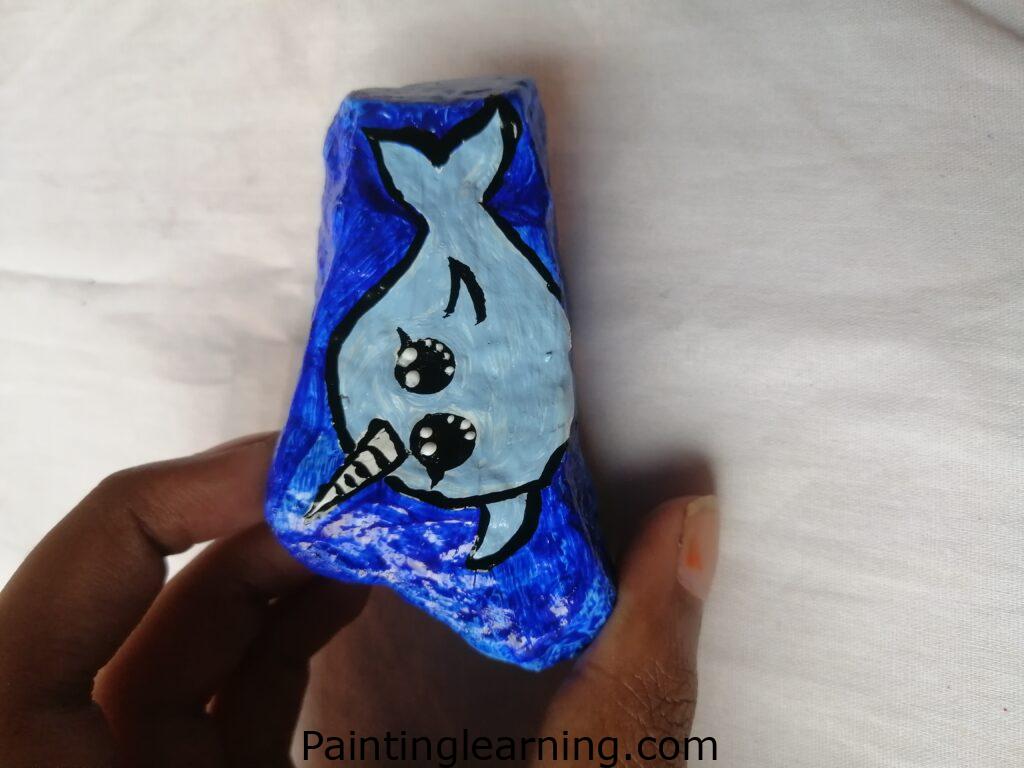
This is where your narwhal really comes to life! Use your detail brush to draw black lines for the outline, facial features, and that iconic tusk. Take your time with this step – the details make all the difference.
Add the eye, mouth, and any other features you want. I love adding small fins and texture lines to make the narwhal look more realistic.
Step 4: Seal and Protect
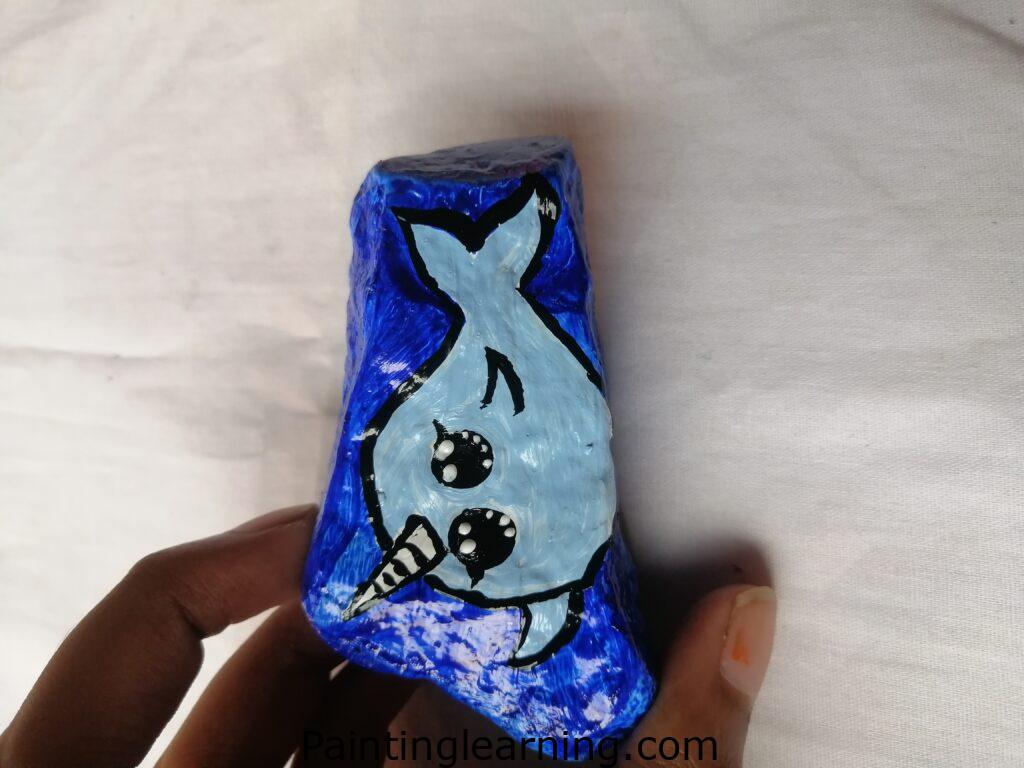
Once everything is completely dry, apply a coat of varnish to protect your artwork. This sealer will keep your narwhal rock looking fresh whether it lives indoors or outdoors.
And there you have it – your narwhal rock is ready to spread joy wherever it goes!
Tips for Success
Here are my best secrets for creating amazing narwhal rocks:
- Choose the right rock: Look for smooth, flat stones about the size of your palm
- Let each layer dry: Rushing leads to muddy colors and smeared details
- Use quality brushes: A good detail brush makes precise lines so much easier
- Practice your design: Sketch on paper first if you’re nervous
- Work in good light: Natural light shows colors most accurately
- Keep paint thin: Multiple thin coats look better than one thick coat
I always tell people to start simple and add complexity as you get comfortable. Your first narwhal rock doesn’t need to be perfect!
Common Mistakes and How to Avoid Them
Mistake 1: Painting on rough rocks Choose smooth stones instead. Rough surfaces make painting difficult and the final result looks messy.
Mistake 2: Not letting paint dry between steps Always wait for complete drying. Wet paint will smear and create muddy colors.
Mistake 3: Using too much paint Thin, even coats work best. Thick paint takes forever to dry and often cracks.
Mistake 4: Skipping the sealer Varnish protects your work from weather and handling. Don’t skip this final step!
Mistake 5: Rushing the details Take your time with the black outlines and features. This is what makes your narwhal recognizable.
Similar Variations You Can Make
Once you’ve mastered basic narwhal rock painting instructions, try these fun variations:
Baby Narwhal Rocks: Create smaller versions using lighter blues and shorter tusks. These are adorable in groups!
Narwhal Family Sets: Paint parent and baby narwhals together on connected rocks.
Colorful Narwhals: Try purple, pink, or teal instead of traditional blue. Kids love these rainbow versions!
Realistic Narwhals: Add more detailed shading and texture for a lifelike appearance.
Cartoon Narwhals: Give them big eyes and smiling faces for a whimsical look.
Seasonal Narwhals: Add Santa hats for Christmas or flower crowns for spring.
I’ve tried all these variations, and each one brings its own charm to the project.
Advanced Techniques
Ready to take your narwhal rocks to the next level? Here are some techniques I use:
Dry Brushing: Use a mostly dry brush to add texture to the whale’s skin. This creates a more realistic appearance.
Color Blending: While the blue paint is still wet, add touches of darker blue or gray for dimension.
Highlighting: Add small white spots or lines to show light reflecting off the whale’s body.
Background Elements: Paint water splashes, bubbles, or ice around your narwhal.
Glow Effects: Use white paint to create a magical glow around the tusk.
Where to Display Your Narwhal Rocks
These beautiful creations deserve the perfect home:
- Garden borders: They add whimsy to flower beds
- Indoor displays: Create a collection on a shelf or windowsill
- Gifts: Hand-painted rocks make thoughtful presents
- Rock painting groups: Share in community hiding spots
- Children’s rooms: Perfect for ocean-themed decorations
I keep some of my favorite narwhal rocks on my desk. They never fail to make me smile!
Caring for Your Narwhal Rocks
With proper care, your painted rocks will last for years:
- Dust regularly: Use a soft brush to remove dirt
- Avoid harsh chemicals: Clean with mild soap and water only
- Reapply varnish: Touch up the sealer annually for outdoor rocks
- Store safely: Keep indoor rocks away from direct sunlight
- Handle gently: The painted surface can chip if dropped
FAQs
Q: How long does it take to make a narwhal rock? A: About 2-3 hours total, including drying time between steps.
Q: Can kids do this project? A: Absolutely! Children 6 and older can create simple narwhal rocks with supervision.
Q: What if I make a mistake? A: Let the paint dry, then paint over it. Acrylic paint is very forgiving.
Q: How do I find good rocks for painting? A: Look near rivers, beaches, or landscaping supply stores. Smooth, flat stones work best.
Q: Can I use different colors? A: Yes! While blue is traditional, any color can work for creative narwhal designs.
Q: How waterproof are sealed rocks? A: Very! Proper varnish makes them suitable for outdoor display.
Troubleshooting Common Issues
Paint won’t stick: Clean your rock thoroughly and let it dry completely before painting.
Colors look dull: Make sure you’re using enough paint and consider adding a second coat.
Details are hard to see: Use a darker color for outlines or add white highlights.
Varnish looks cloudy: Apply thinner coats and ensure the paint is completely dry first.
Brush strokes show: Use a flat brush for base coats and blend while the paint is wet.
The Magic of Narwhal Rock Painting
There’s something truly special about creating these mythical creatures on stone. Each narwhal rock tells its own story and brings a bit of Arctic magic into our everyday lives. I’ve painted hundreds of rocks over the years, and narwhals remain my absolute favorite.
The process is meditative and rewarding. Watching a plain rock transform into a magical sea creature never gets old. Plus, the joy on people’s faces when they discover one of your painted rocks is priceless.
Whether you’re looking for a relaxing hobby, a fun family activity, or a way to spread joy in your community, narwhal rock painting instructions offer the perfect solution. These easy narwhal rocks bring smiles wherever they go and create lasting memories for everyone involved.