Easy Turkey Painted Rocks: Your Complete Step-by-Step Guide to Creating Beautiful Thanksgiving Decorations
Ever wondered how to paint a Turkey on a rock that’ll make your neighbors stop and stare? I’m about to show you the most rewarding rock painting project you’ll ever try.
Simple Turkey painted rocks Step by step – that’s exactly what we’re diving into today. Get ready for an enchanting journey that transforms ordinary stones into stunning Thanksgiving masterpieces.
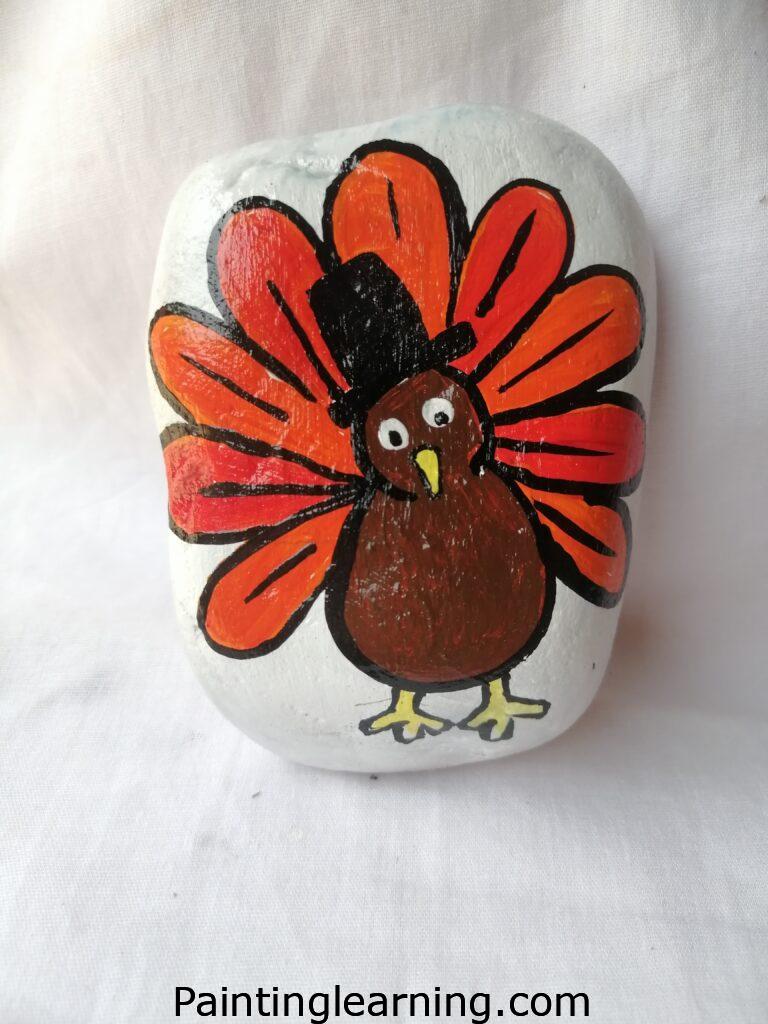
What We’re Creating Today: Turkey Painted Rocks
Let me tell you something – Turkey painted rocks aren’t just decorations. They’re little pieces of art that bring joy to everyone who sees them. I’ve been painting rocks for years, and Turkey designs remain my absolute favorite for fall decorating.
These charming creations capture the essence of Thanksgiving in a way that’s both rustic and elegant. Picture this: vibrant orange, red, and yellow feathers painted on smooth river rocks, creating miniature turkeys that seem to strut right off the stone. The best part? Anyone can do this.
I remember the first time I attempted Turkey painted rock instructions. I was skeptical – could something so simple really look professional? The answer blew me away. Within an hour, I had created something that looked like it came from a craft store.
Materials Needed
Here’s your complete shopping list with detailed specifications:
| Material | Quantity | Size/Type | Purpose | Cost Range |
|---|---|---|---|---|
| Rocks | 3-5 pieces | 2-4 inches, smooth surface | Base for painting | $0-5 |
| Acrylic Paint – White | 1 bottle | 2oz minimum | Base coat | $1-3 |
| Acrylic Paint – Orange | 1 bottle | 2oz minimum | Turkey body | $1-3 |
| Acrylic Paint – Red | 1 bottle | 2oz minimum | Wattle/accents | $1-3 |
| Acrylic Paint – Yellow | 1 bottle | 2oz minimum | Beak/feather highlights | $1-3 |
| Acrylic Paint – Brown | 1 bottle | 2oz minimum | Feather details | $1-3 |
| Acrylic Paint – Black | 1 bottle | 2oz minimum | Outlines/details | $1-3 |
| Varnish | 1 bottle | Acrylic sealer | Protection/shine | $3-6 |
| Flat Brush | 1 brush | ½ inch wide | Base painting | $2-4 |
| Detail Brush | 1 brush | Size 0 or 1 | Fine details/lines | $2-4 |
Key Terms and Definitions
Base Coat : The first layer of paint applied to prepare the rock surface for detailed work.
Acrylic Paint : Fast-drying paint made of pigment suspended in acrylic polymer emulsion, perfect for rock painting.
Varnish : A clear protective coating that seals the paint and adds shine to finished projects.
Detail Brush : A small, fine-tipped brush used for creating precise lines and small features.
Step-by-Step Turkey Painted Rock Instructions
Step 1: Apply the Base Color
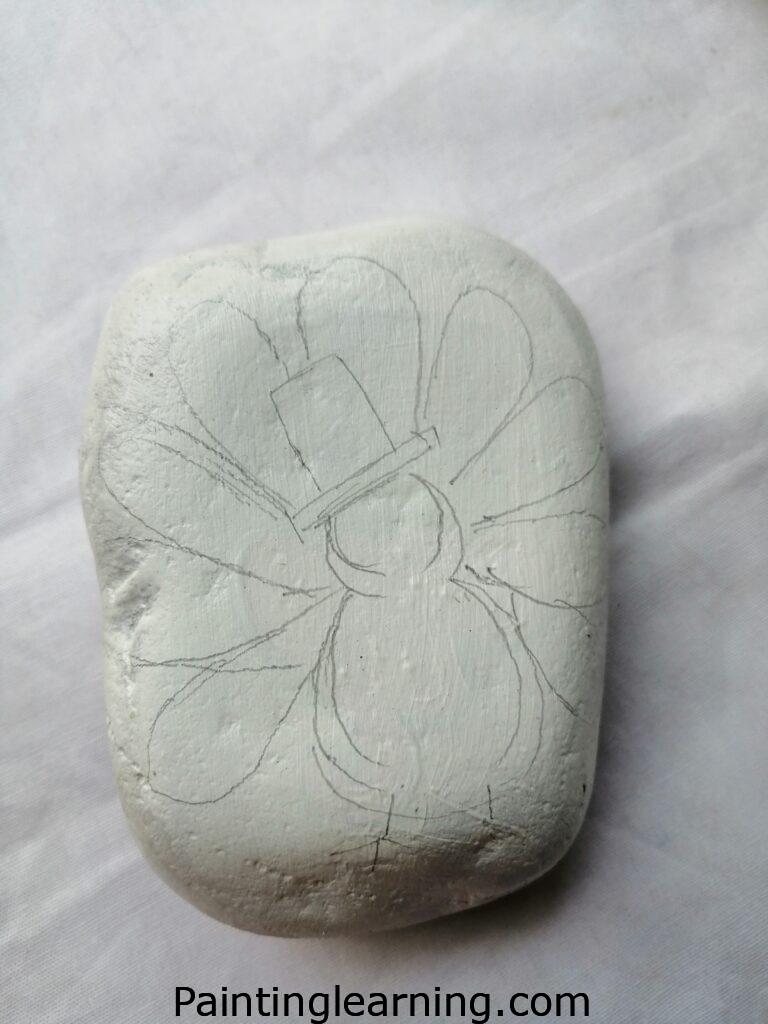
First things first – paint your rock white and let it dry completely. This might seem unnecessary, but trust me on this one. The white base makes all your colors pop like you wouldn’t believe.
I learned this the hard way when I skipped this step on my first attempt. The colors looked muddy and dull. Now I never skip the base coat.
While the white paint dries (usually 15-20 minutes), sketch your Turkey design on paper. This helps you visualize the final result before touching brush to rock.
Step 2: Paint the Turkey Design

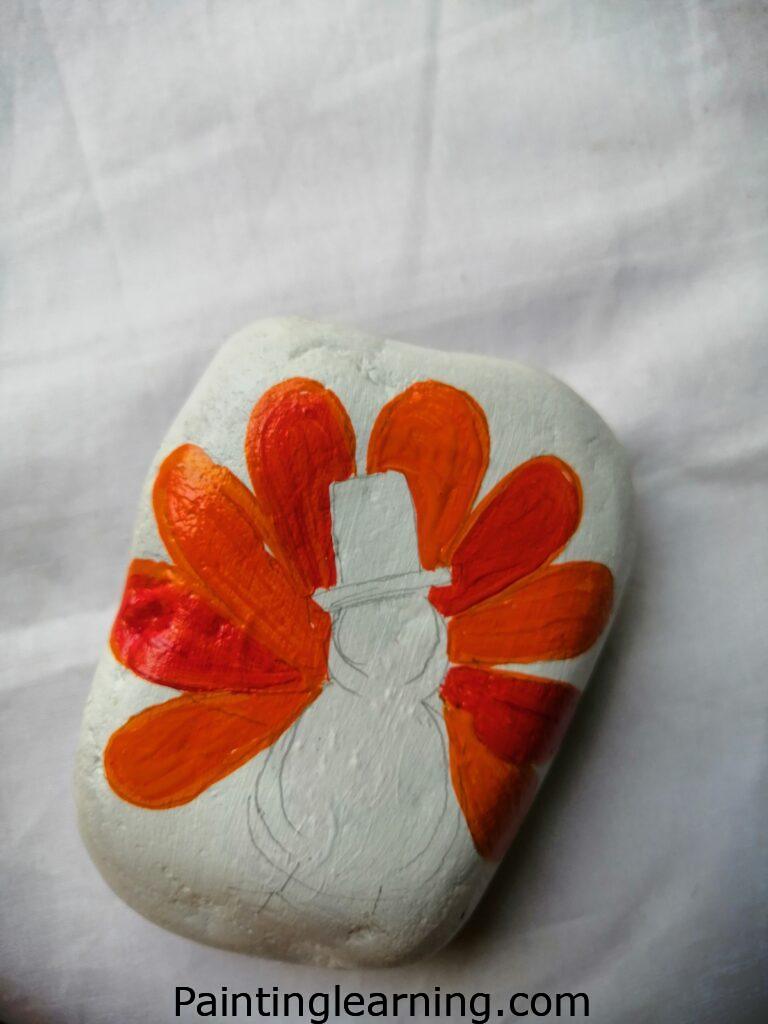
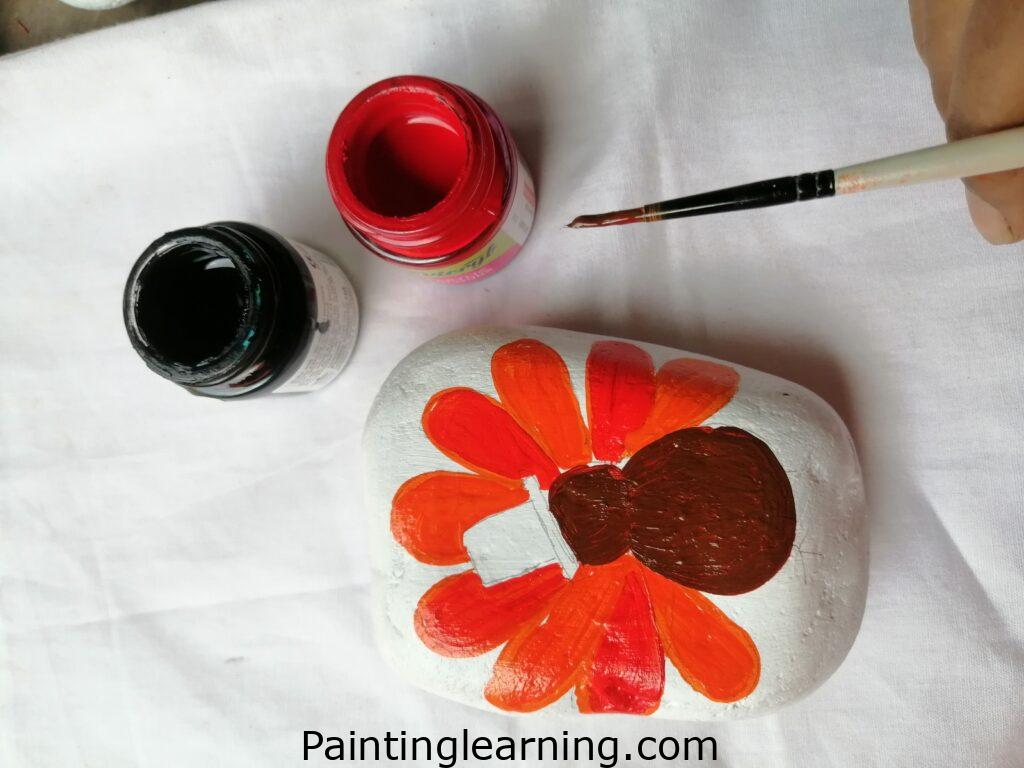
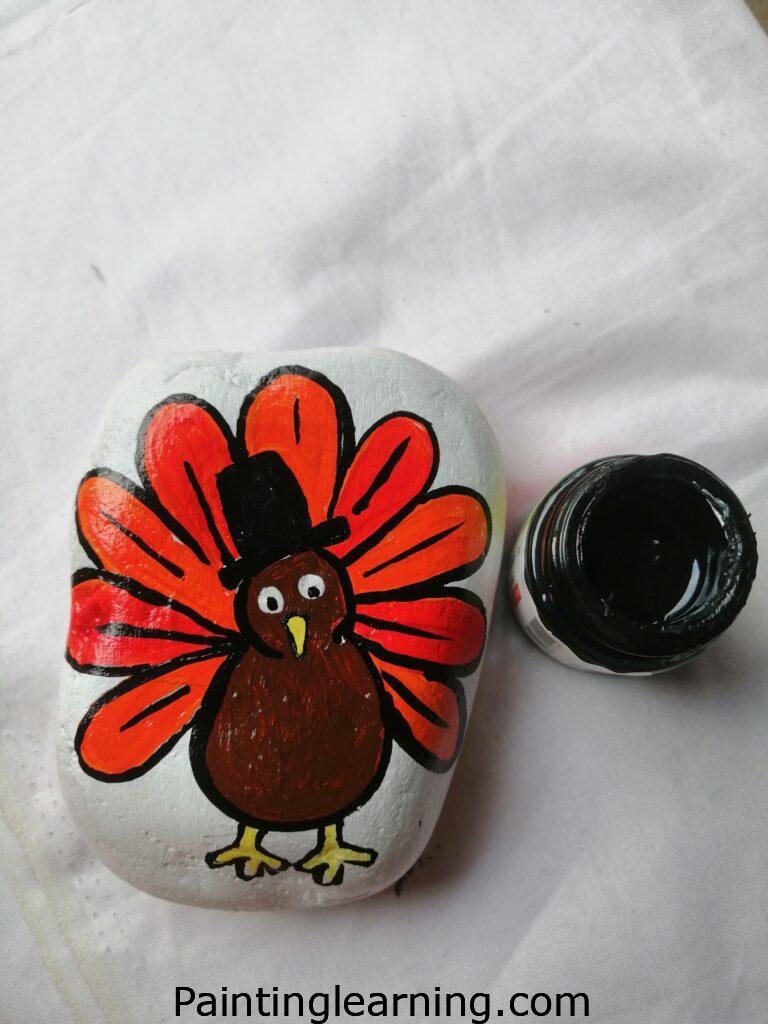
Now comes the fun part – paint the rocks just like the reference picture. Start with the body using orange paint. Work from the center outward, creating smooth, even strokes.
Add the red sections next. These typically include the wattle (that dangly part under the Turkey’s chin) and some feather accents. Yellow comes after red – perfect for the beak and feather highlights.
Finally, add brown details to create depth in the feathers. Layer these colors while they’re still slightly wet for better blending. Let everything dry completely before moving to the next step.
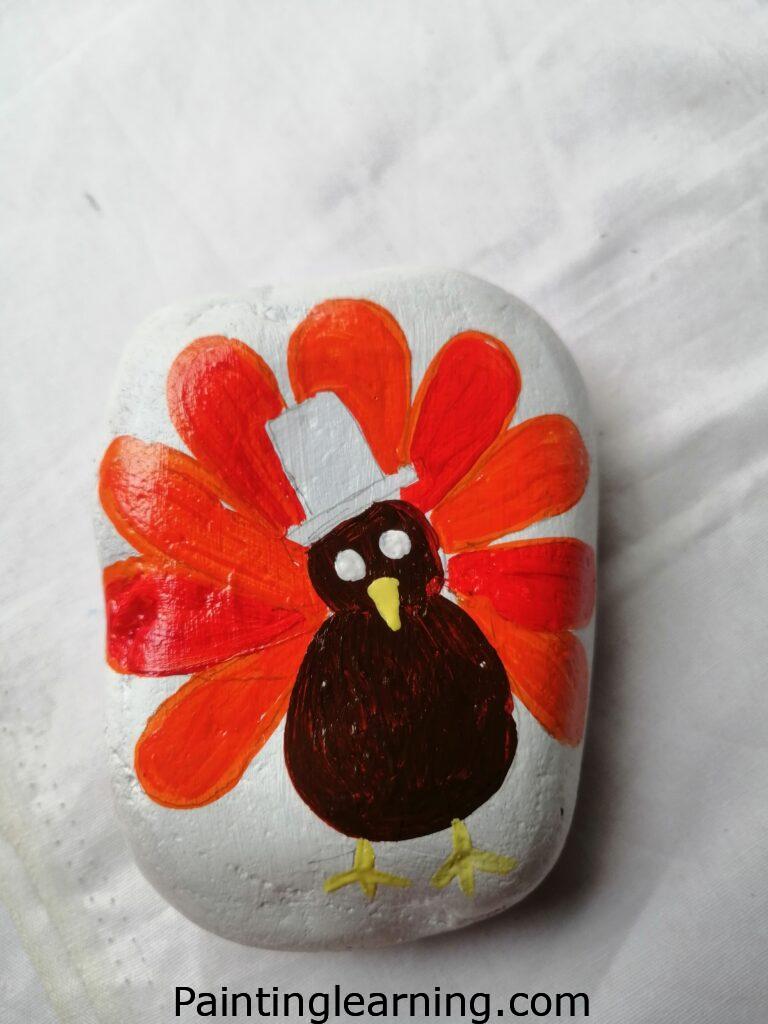
Step 3: Add Black Outlines
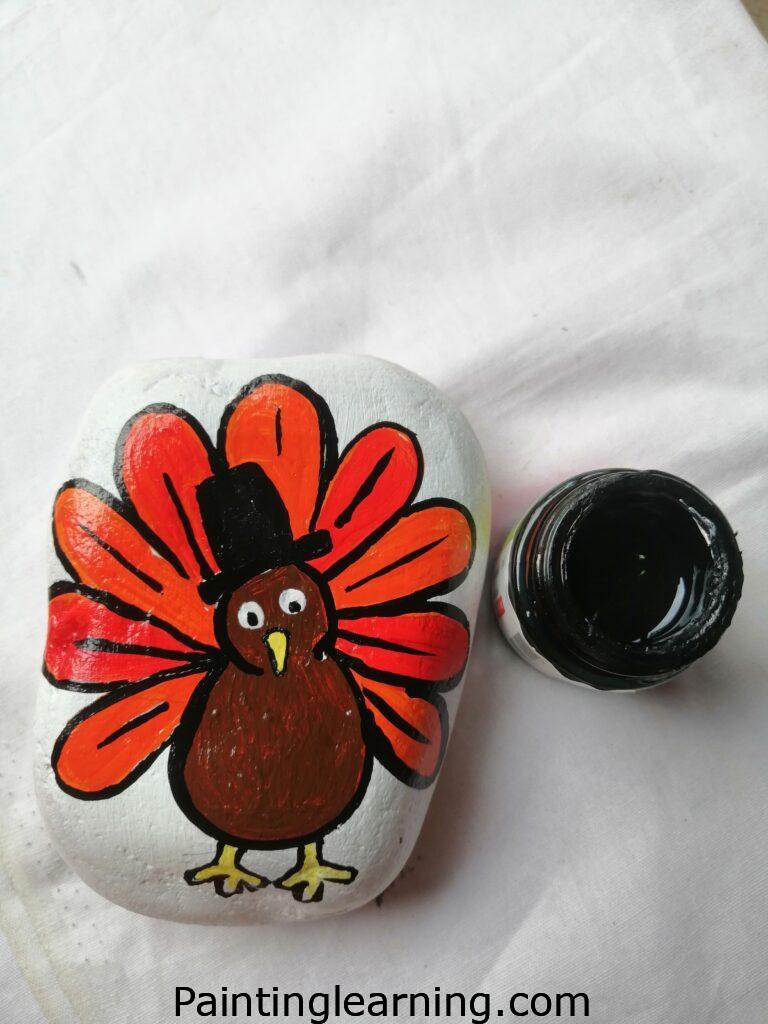
This step transforms your Turkey from good to absolutely stunning. Using your detail brush, carefully draw black lines around all the major features.
Start with the Turkey’s head outline, then move to the body. Add feather separations and eye details. The black lines should be thin but confident – don’t hesitate or your lines will look shaky.
Let the black paint dry completely before applying varnish. This usually takes about 30 minutes.
Step 4: Apply Protective Varnish
Your Turkey rocks are almost ready! Apply a thin, even coat of varnish using your flat brush. This protects your artwork and gives it a beautiful, professional finish.
Work in smooth strokes from one end to the other. Don’t go back over areas you’ve already varnished – this can create streaks.
Tips for Success
Here are the secrets I’ve learned from painting hundreds of Turkey rocks:
- Choose the right rocks – Look for smooth, flat surfaces about 2-4 inches wide
- Clean your rocks first – Wash with soap and water, then let dry completely
- Use quality brushes – Cheap brushes shed bristles and create frustration
- Work in good lighting – Natural light shows true colors better than artificial
- Take your time – Rushing leads to mistakes and messy details
- Practice brush control – Try practice strokes on paper first
- Keep paint consistency – Add tiny amounts of water if paint gets too thick
I always tell beginners: your first Turkey rock won’t be perfect. That’s totally normal! My first attempt looked more like a confused chicken than a majestic Turkey. But by the third rock, I was creating pieces I was proud to display.
Common Mistakes and How to Avoid Them
Mistake 1: Skipping the Base Coat
Why it happens: People want to jump straight to the fun colors. How to avoid: Always apply white base coat first. It makes colors brighter and more vibrant.
Mistake 2: Painting on Wet Surfaces
Why it happens: Impatience – wanting to add the next color immediately. How to avoid: Wait for each layer to dry completely. Use a hair dryer to speed up drying if needed.
Mistake 3: Using Too Much Paint
Why it happens: Thinking more paint equals better coverage. How to avoid: Use thin layers. Multiple thin coats look better than one thick coat.
Mistake 4: Shaky Black Lines
Why it happens: Nervousness or using the wrong brush. How to avoid: Practice on paper first. Use a good detail brush and move confidently.
Mistake 5: Forgetting to Seal
Why it happens: Excitement to show off the finished piece. How to avoid: Always apply varnish. It protects your hard work from weather and handling.
Similar Variations You Can Create
Once you’ve mastered the basic Turkey design, try these exciting variations:
Pilgrim Turkey Rocks Add a tiny pilgrim hat using black and white paint. Include a small buckle detail in yellow.
Feather Pattern Turkeys Create intricate feather patterns using different brush techniques. Stipple with a sponge for texture.
Family Turkey Sets Make different sized Turkeys to represent family members. Add names or initials.
Seasonal Turkey Scenes Paint autumn leaves around your Turkey. Add falling leaves and harvest elements.
Cartoon Style Turkeys Use brighter colors and exaggerated features for a fun, kid-friendly version.
Realistic Turkey Portraits Challenge yourself with detailed feather work and realistic proportions.
I’ve created entire collections using these variations. Each one tells a different story and adds personality to any display.
Advanced Techniques for Experienced Painters
Dry Brushing for Texture
Load your brush with paint, then remove most of it on paper towel. Lightly brush over raised areas for realistic feather texture.
Color Blending
While paint is still wet, blend colors together for smooth transitions. This works especially well for feathers.
Highlighting and Shadows
Add white highlights to raised areas and darker browns to recessed areas. This creates dimensional depth.
Stippling Technique
Use a sponge or stippling brush to create interesting textures on feathers and backgrounds.
Caring for Your Finished Turkey Rocks
Your beautiful Turkey rocks will last for years with proper care:
- Store indoors during harsh weather – Even with varnish, extreme conditions can damage paint
- Clean gently – Use a soft, damp cloth for cleaning
- Reapply varnish annually – This maintains protection and shine
- Display thoughtfully – Avoid direct sunlight which can fade colors over time
Troubleshooting Common Issues
Paint won’t stick to rock
- Clean rock thoroughly with degreasing dish soap
- Let dry completely before painting
- Consider using a primer designed for non-porous surfaces
Colors look muddy
- Use white base coat always
- Let each color dry before adding the next
- Clean brushes between colors
Varnish looks streaky
- Apply thinner coats
- Use smooth, even strokes
- Don’t go back over already varnished areas
FAQs
Q: Can I use regular paint instead of acrylic? A: Acrylic paint is essential for rock painting. It adheres better, lasts longer, and provides vibrant colors that won’t wash away.
Q: How long does the whole project take? A: Plan for 2-3 hours total, including drying time between steps. The actual painting time is about 45 minutes.
Q: Can kids do this project? A: Absolutely! Kids love Turkey painted rocks. Just supervise the detail work and help with the varnishing step.
Q: What if I make a mistake? A: Let the paint dry, then paint over it. Acrylic paint is very forgiving and covers mistakes well.
Q: Where can I find good rocks? A: River rocks from garden centers work perfectly. You can also find smooth rocks at craft stores or collect them from beaches (where permitted).
Q: How do I know when paint is dry enough for the next step? A: Touch the paint lightly with your finger. If it doesn’t transfer or feel tacky, it’s ready.
Conclusion
Creating Easy Turkey painted rocks has become one of my favorite autumn traditions. There’s something magical about transforming a simple stone into a piece of art that brings smiles to everyone who sees it.
How to paint a Turkey on a rock isn’t just about following steps – it’s about expressing creativity and creating something beautiful with your own hands. Each rock you paint becomes a unique treasure, perfect for decorating your home or giving as heartfelt gifts during the Thanksgiving season.