Easy Marbleized Painted Rocks: Your Complete Guide to Creating Stunning Stone Art
Ever stared at a boring rock and wondered how to transform it into something magical?
You’re about to discover the enchanting world of marbleized rock painting.
This simple technique will turn ordinary stones into mesmerizing masterpieces that’ll make everyone ask “how did you do that?”

What Are Marbleized Painted Rocks?
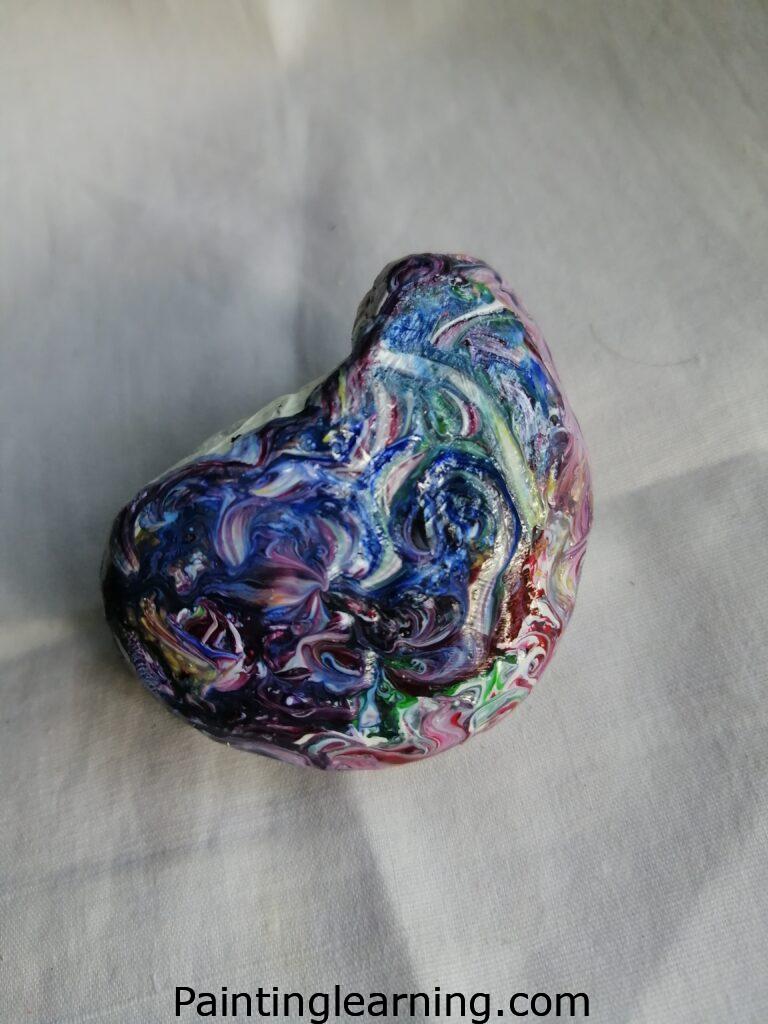
I absolutely love talking about marbleized painted rocks because they’re like little pieces of captured magic. Think of them as nature’s canvas meeting artistic flair. When you create a marbleized effect on rocks, you’re essentially mimicking the swirling patterns found in actual marble stone.
The beauty of this technique lies in its unpredictability. Each rock becomes a unique piece of art with flowing, organic patterns that seem to dance across the surface. It’s like holding a miniature galaxy in your hands.
What makes marbleized rocks so special is their versatility. You can use them as garden decorations, paperweights, gifts, or simply as therapeutic art projects. The process itself is incredibly relaxing and meditative.
Materials Needed
Here’s everything you’ll need to create your own stunning marbleized rocks:
| Material | Purpose | Quantity Needed | Alternative Options | Cost Range |
|---|---|---|---|---|
| Rocks | Base surface for painting | 3-5 smooth stones | River rocks, beach stones | $0-5 |
| White Acrylic Paint | Base coat foundation | 2-3 oz bottle | Gesso primer | $2-4 |
| Multicolor Acrylic Paint | Creating marble patterns | 4-6 different colors | Tempera paint (less durable) | $8-15 |
| Varnish/Sealer | Protective finish | 1 small bottle | Mod Podge, clear spray | $3-8 |
| Flat Brush | Applying base coat | 1-2 brushes (1-2 inch) | Foam brush, sponge | $2-5 |
| Detail Brush | Fine pattern work | 2-3 small brushes | Toothpick, cotton swab | $3-6 |
| Water Container | Brush cleaning | 1 jar or cup | Any clean container | $0 |
| Paper Towels | Cleanup and blending | 1 roll | Cloth rags | $2-3 |
| Palette | Color mixing | 1 disposable plate | Wax paper, glass | $1-3 |
Simple Marbleized Painted Rocks Step by Step
Let me walk you through the marbleized painted rock instructions that I’ve perfected over years of rock painting adventures.
Step 1: Base Color Application
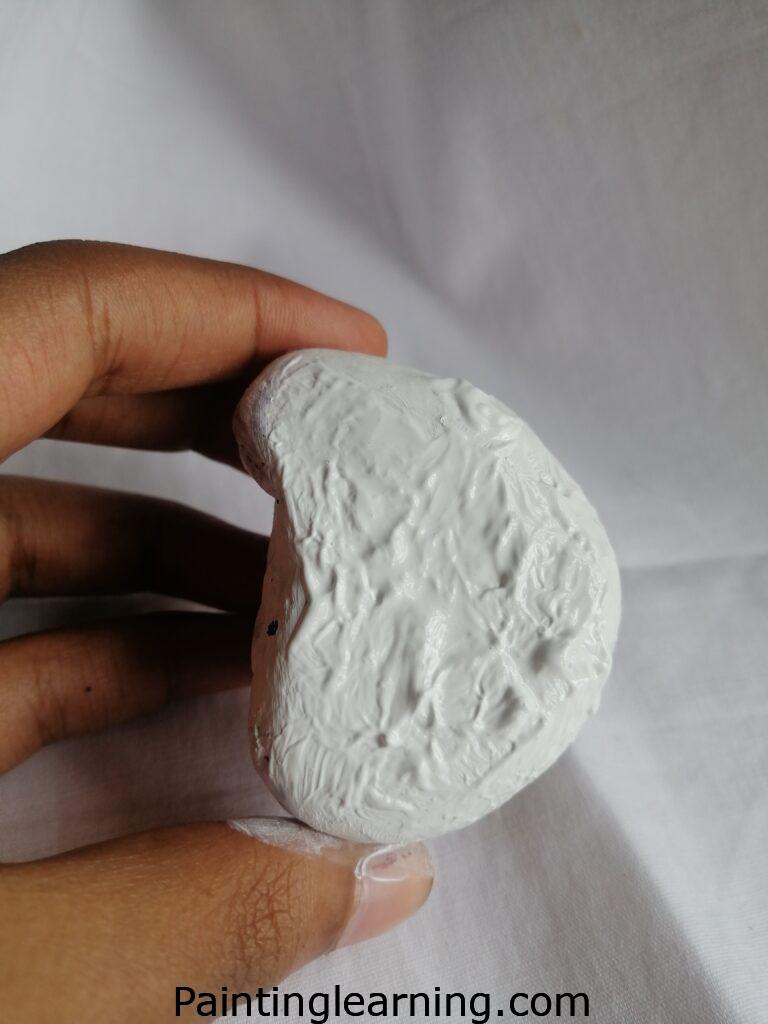
First, I paint the entire rock with white acrylic paint using my flat brush. Here’s the crucial part – don’t let it dry completely. The white base needs to stay slightly wet for the marbling technique to work properly.
This step creates the foundation for all your beautiful patterns. Think of it as preparing a canvas that’s ready to receive your artistic magic.
Step 2: Color Mixing and Pattern Creation
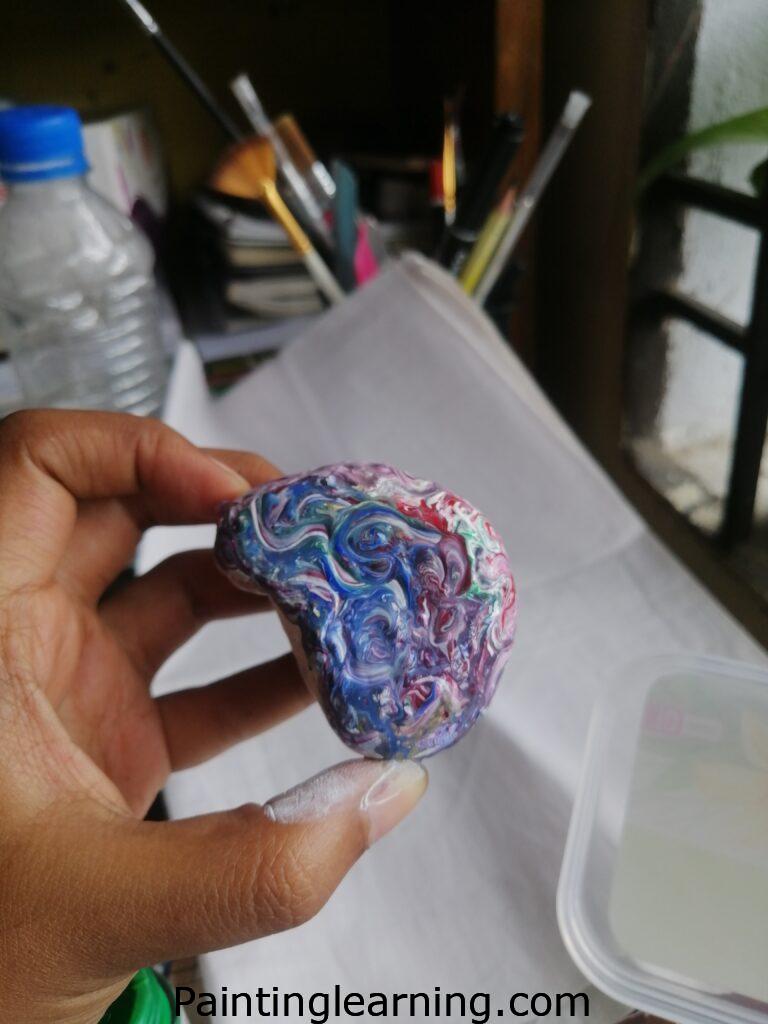
Now comes the fun part! I mix different colors on my palette – maybe some blues, purples, and gold. While the white base is still tacky, I carefully drop small amounts of these mixed colors onto the rock surface.
Using my detail brush, I gently swirl and blend these colors into the wet white base. The key is to work quickly but deliberately. You want flowing, organic patterns that look natural and mesmerizing.
Let this dry completely before moving to the final step.
Step 3: Final Touches
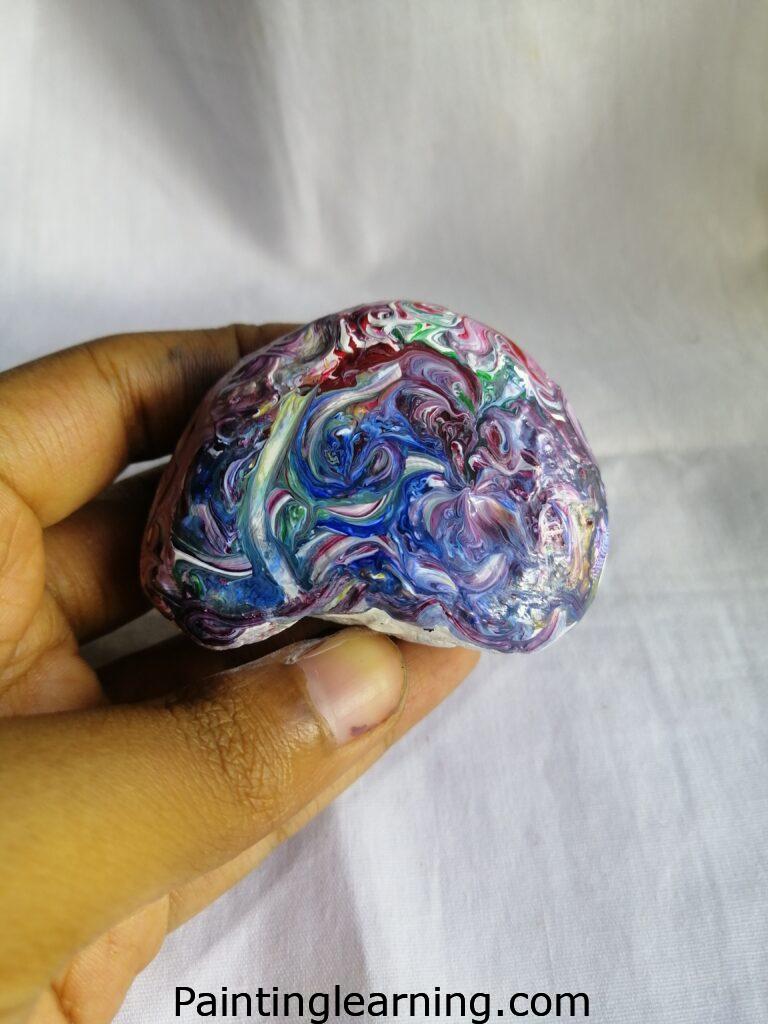
Once everything is dry, your marbleized rock is essentially complete! I like to add a protective coat of varnish to seal the design and give it a beautiful, glossy finish.
This final step ensures your artwork will last for years, whether it’s displayed indoors or weathering the elements in your garden.
Tips for Success
Creating perfect marbleized rocks takes practice, but these tips will help you succeed faster:
Work in Good Lighting Natural light helps you see color variations better. I always set up near a window when possible.
Keep Paint Consistency Right Your paint should be creamy, not too thick or watery. If it’s too thick, add a tiny bit of water. Too thin? Let it sit uncovered for a few minutes.
Practice the Swirling Motion Before working on your good rocks, practice your swirling technique on paper. Gentle, flowing movements create the most natural-looking marble patterns.
Use Quality Brushes Good brushes make a huge difference. They hold paint better and create smoother lines.
Work in Small Batches Don’t try to marble too many rocks at once. The timing is crucial, and you need to work while the base coat is still slightly wet.
Common Mistakes and How to Avoid Them
Mistake 1: Letting the Base Dry Too Much Solution: Work quickly after applying the white base. If it starts drying, mist it lightly with water.
Mistake 2: Using Too Much Color Solution: Less is more with marbling. Start with small drops and build up gradually.
Mistake 3: Over-Mixing Colors Solution: Gentle swirls create better patterns than aggressive mixing. You want distinct color bands, not muddy blends.
Mistake 4: Wrong Paint Consistency Solution: Test your paint on a practice surface first. It should flow easily but not be runny.
Mistake 5: Rushing the Drying Process Solution: Patience is key. Let each layer dry completely before adding the next.
Similar Variations You Can Try
Once you’ve mastered the basic technique for how to paint a marbleized on a rock, here are some exciting variations:
Galaxy Marbling Use deep blues, purples, and black with tiny white dots for stars. Add some metallic silver for extra sparkle.
Ocean Wave Marbling Combine blues, whites, and seafoam greens in flowing patterns that mimic ocean waves.
Sunset Marbling Blend warm oranges, pinks, and yellows for a gorgeous sunset effect.
Metallic Marbling Incorporate gold, silver, or copper paints for an elegant, sophisticated look.
Seasonal Marbling Create autumn leaves patterns with reds, oranges, and browns, or spring flowers with pastels.
Advanced Techniques
Feathering Effect Drag a toothpick through wet paint in alternating directions to create feather-like patterns.
Bullseye Patterns Drop colors in concentric circles, then drag from center outward for stunning bullseye effects.
Gradient Marbling Start with darker colors at one end and gradually blend to lighter shades at the other.
Troubleshooting Common Issues
Problem: Paint Won’t Blend Solution: Your base coat might be too dry. Next time, work faster or mist with water.
Problem: Colors Look Muddy Solution: You’re probably over-mixing. Use lighter touches and let colors maintain some separation.
Problem: Paint Cracks When Dry Solution: You might be applying paint too thickly. Use thinner coats and build up gradually.
Caring for Your Marbleized Rocks
Indoor Display Keep them away from direct sunlight to prevent fading. Dust gently with a soft, dry cloth.
Outdoor Use Reapply varnish every 6-12 months depending on weather exposure. Store indoors during harsh winter months.
Cleaning Use mild soap and water if needed. Avoid harsh chemicals that might damage the paint.
Creative Uses for Your Marbleized Rocks
Garden Decorations Place them among plants or create rock gardens with varying sizes and patterns.
Paperweights Perfect for holding down papers on your desk or craft table.
Gifts Personalized marbleized rocks make thoughtful, unique presents for any occasion.
Meditation Stones The smooth, beautiful patterns make them perfect for meditation or stress relief.
FAQs
Q: Can I use regular house paint instead of acrylic? A: I don’t recommend it. Acrylic paint adheres better to rocks and provides more vibrant colors.
Q: How long does the marbling process take? A: About 15-20 minutes per rock, plus drying time between coats.
Q: Can kids do this project? A: Absolutely! It’s perfect for ages 8 and up with adult supervision.
Q: What’s the best rock shape for marbling? A: Smooth, rounded rocks work best. Avoid rocks with lots of cracks or very porous surfaces.
Q: How do I fix mistakes? A: While the paint is wet, you can wipe it off with a damp cloth and start over. Once dry, you’ll need to sand and repaint.
Q: Can I marble painted rocks that are already colored? A: Yes, but you’ll need to prime them with white paint first for the best results.
Cost Breakdown and Budget Tips
Creating marbleized rocks is surprisingly affordable:
- Basic starter kit: $20-30
- Cost per rock: $1-2
- Money-saving tips: Buy paints in bulk, use rocks from your yard, share supplies with friends
Seasonal Considerations
Spring: Perfect time to start – moderate temperatures and good ventilation Summer: Work in shade to prevent paint from drying too quickly Fall: Great for creating autumn-themed color schemes Winter: Indoor projects only in most climates
Summary
Creating easy marbleized painted rocks is one of the most rewarding and accessible art forms I’ve ever discovered. The combination of simple materials, straightforward techniques, and endless creative possibilities makes this craft perfect for beginners and experienced artists alike.
Remember, every rock you create will be completely unique – that’s the magic of marbling! Whether you’re looking for a relaxing hobby, a way to beautify your garden, or a thoughtful gift idea, marbleized rocks deliver on all fronts. So grab some rocks, gather your paints, and start creating your own collection of stunning marbleized masterpieces today.