Easy Fox Painted Rocks: Complete Step-by-Step Guide
Ever wondered how to transform ordinary rocks into adorable woodland creatures? Fox painted rocks bring nature’s cunning charm right to your doorstep. I’ll show you exactly how to create these enchanting pieces.
Today, I’m sharing my foolproof method for Easy Fox painted rocks that’ll have you hooked from the first brushstroke. These little masterpieces make perfect garden decorations or heartwarming gifts. Ready to dive into this rewarding rock painting adventure?
Creating Your Own Fox Painted Rock Masterpiece
Let me tell you about fox painted rocks. They’re absolutely magical.
I remember the first time I painted a fox on a rock. The transformation was incredible. One moment I had a plain stone, and the next, I had this charming woodland creature staring back at me.
Fox rocks capture that mischievous spirit we all love about these clever animals. The pointed ears, the sly expression, and those bright orange colors create an instant connection. It’s like bringing a piece of the forest into your home.
Rock painting has this wonderful way of turning simple stones into treasured keepsakes. When you create fox painted rocks, you’re not just making art – you’re creating something with personality and charm.
Understanding Key Terms
Before we jump into the Simple Fox painted rocks Step by step process, let’s clarify some important terms:
Base coat : The first layer of paint that covers the entire rock surface, creating a uniform foundation for your design.
Acrylic paint : A water-based paint that dries quickly and provides excellent coverage on rocks, perfect for outdoor projects.
Varnish sealer : A protective coating applied over finished artwork to prevent weathering and fading.
Detail brush : A small, fine-tipped brush used for intricate work like facial features and fine lines.
Flat brush : A brush with a straight, wide edge ideal for covering large areas and creating smooth base coats.
Materials Needed
Here’s everything you’ll need for your Fox painted rock instructions project:
| Material | Type/Size | Purpose | Quantity | Alternative Options |
|---|---|---|---|---|
| Rocks | Smooth, oval-shaped | Canvas for painting | 1-3 pieces | River rocks, beach stones |
| White Acrylic Paint | 2oz bottle | Base coat coverage | 1 bottle | Gesso primer |
| Orange Acrylic Paint | 2oz bottle | Main fox body color | 1 bottle | Burnt orange, tangerine |
| Black Acrylic Paint | 2oz bottle | Details and features | 1 bottle | Charcoal gray |
| Varnish | Clear, matte finish | Protective sealer | 1 bottle | Mod Podge, clear acrylic sealer |
| Flat Brush | 1-inch width | Base coat application | 1 piece | Foam brush |
| Detail Brush | Size 2-4 | Fine line work | 1 piece | Liner brush, toothpick |
| Water Container | Any size | Brush cleaning | 1 piece | Mason jar, plastic cup |
| Paper Towels | Standard roll | Cleanup and blotting | 1 roll | Cloth rags |
| Palette | Disposable or reusable | Paint mixing | 1 piece | Paper plate, plastic lid |
Step-by-Step Fox Rock Painting Process
Now for the fun part – let’s dive into how to paint a Fox on a rock!
Step 1: Apply the Base Coat
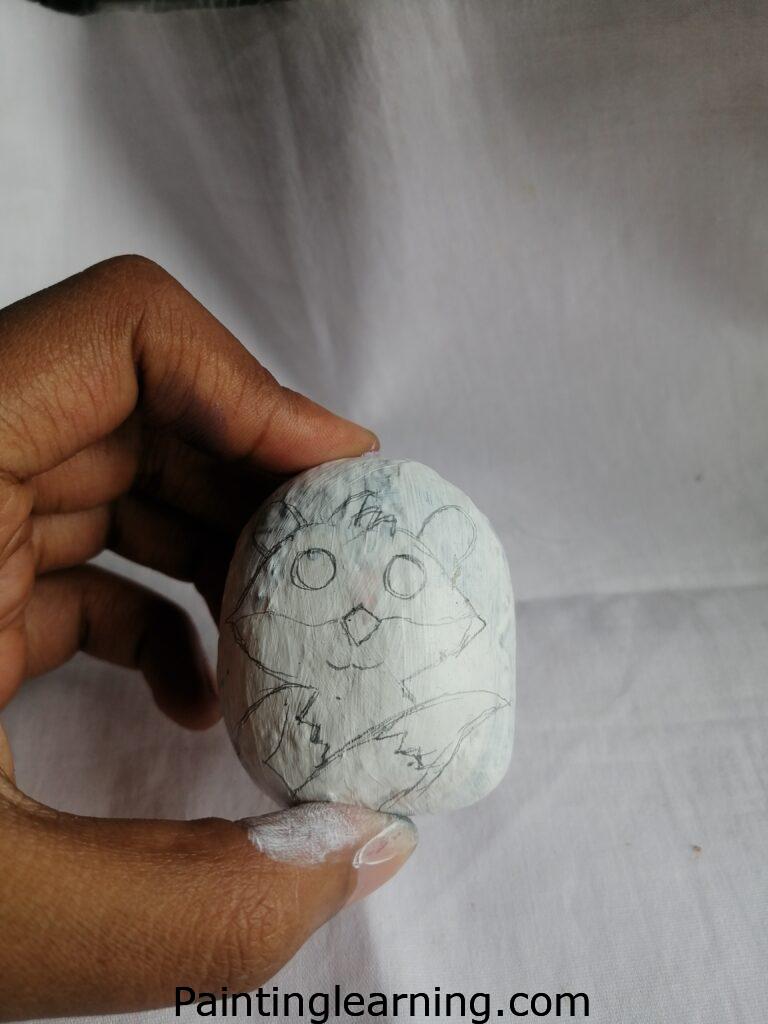
Start with your clean, dry rock. I always begin with a white base coat because it makes the colors pop.
Dip your flat brush into the white paint. Don’t overload it – you want enough paint to cover smoothly without dripping.
Paint the entire rock surface with smooth, even strokes. Work in one direction first, then cross over with perpendicular strokes for complete coverage.
Let this dry completely. I usually wait about 30 minutes, but it depends on your climate. The paint should feel dry to the touch before moving on.
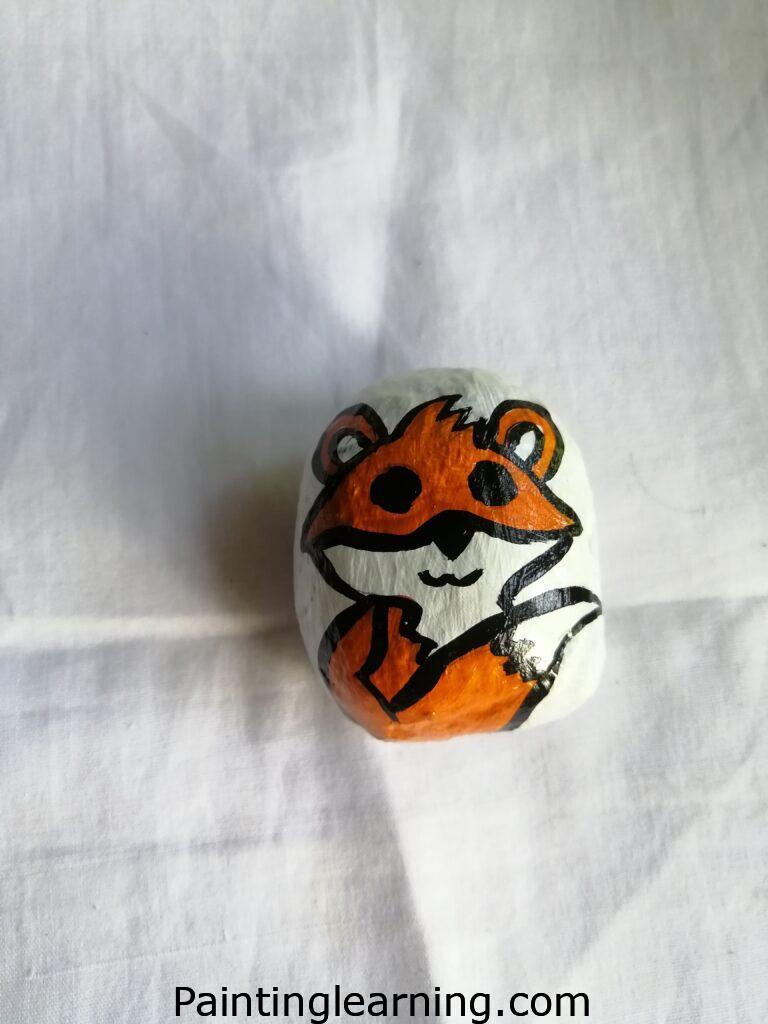
Step 2: Paint the Fox Body
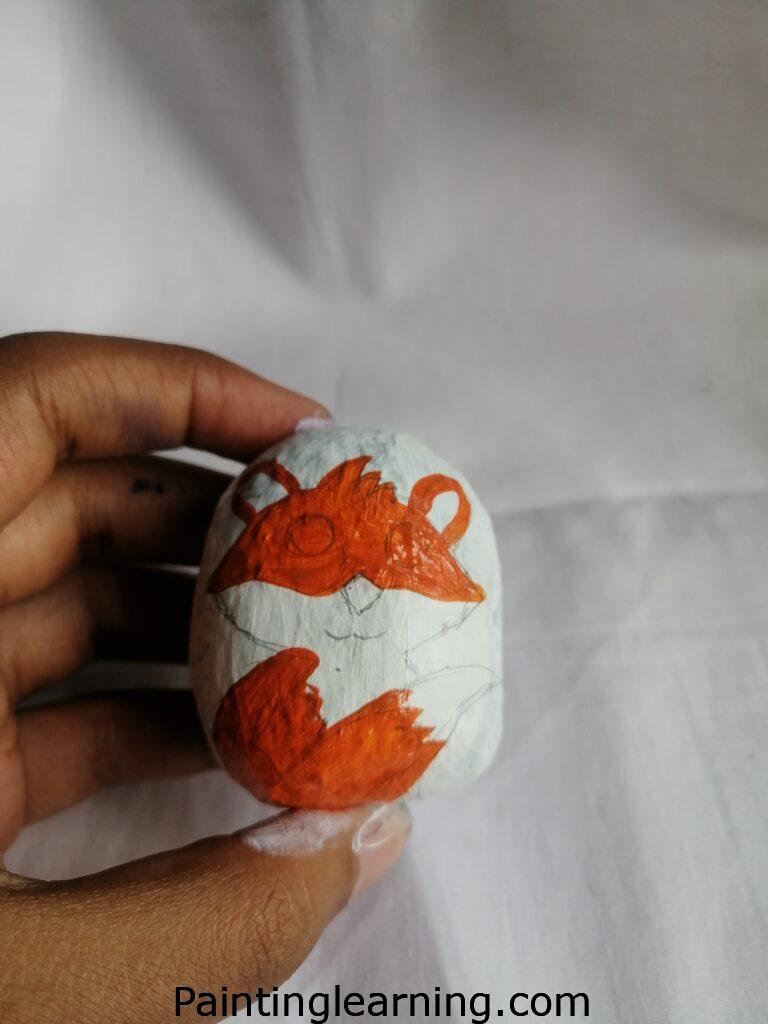
This is where your rock starts looking like a fox! Grab your orange paint and flat brush.
Look at your rock and visualize the fox shape. The pointed end will be the nose, and the wider end becomes the body.
Paint the orange color over the white base, leaving small areas of white for the chest and face markings. Think of how a real fox has that distinctive white bib on its chest.
Apply the orange paint in smooth, confident strokes. Don’t worry about perfection – foxes have natural variations in their coloring.
Let this layer dry completely before moving to the details.
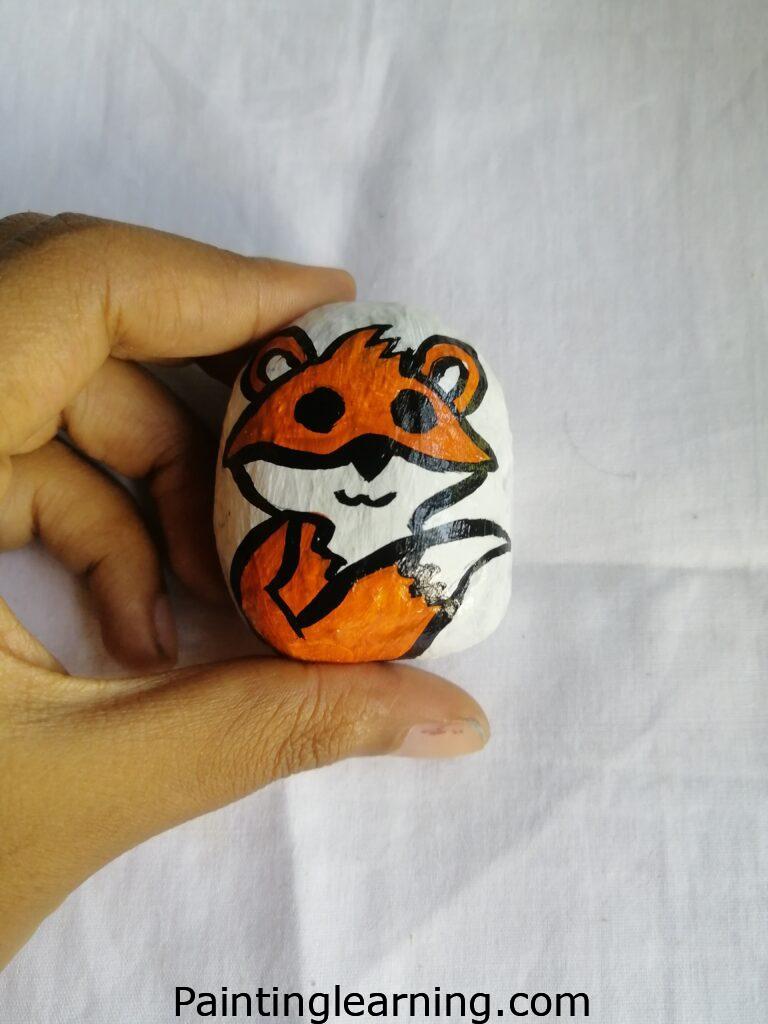
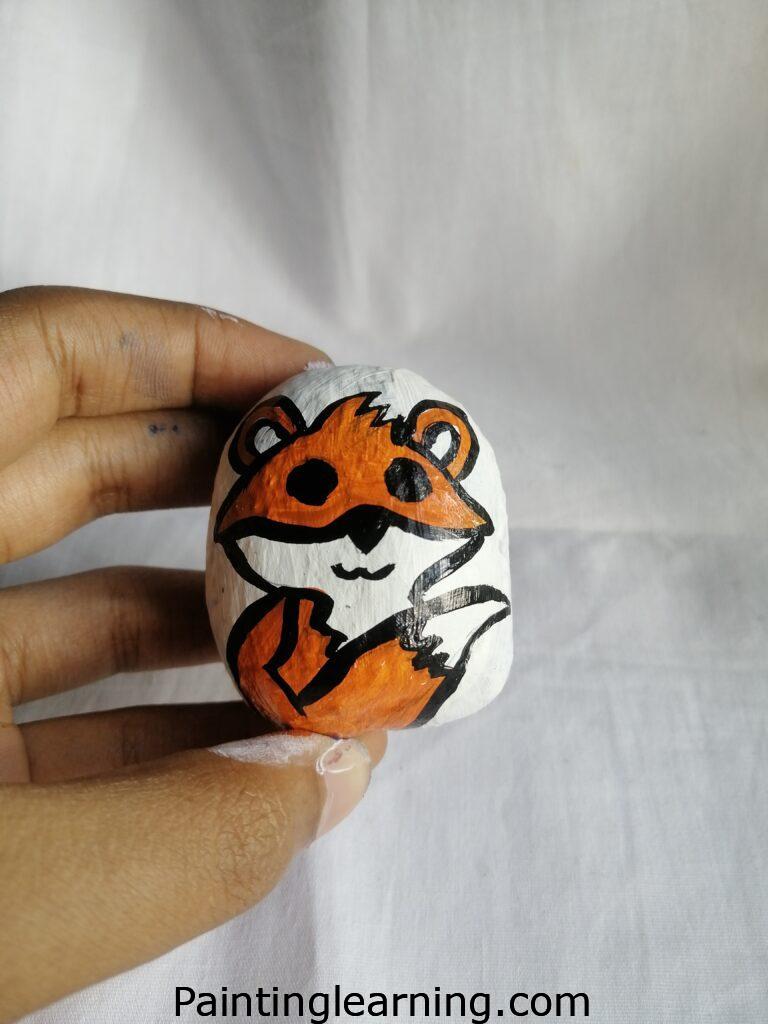
Step 3: Add the Black Details
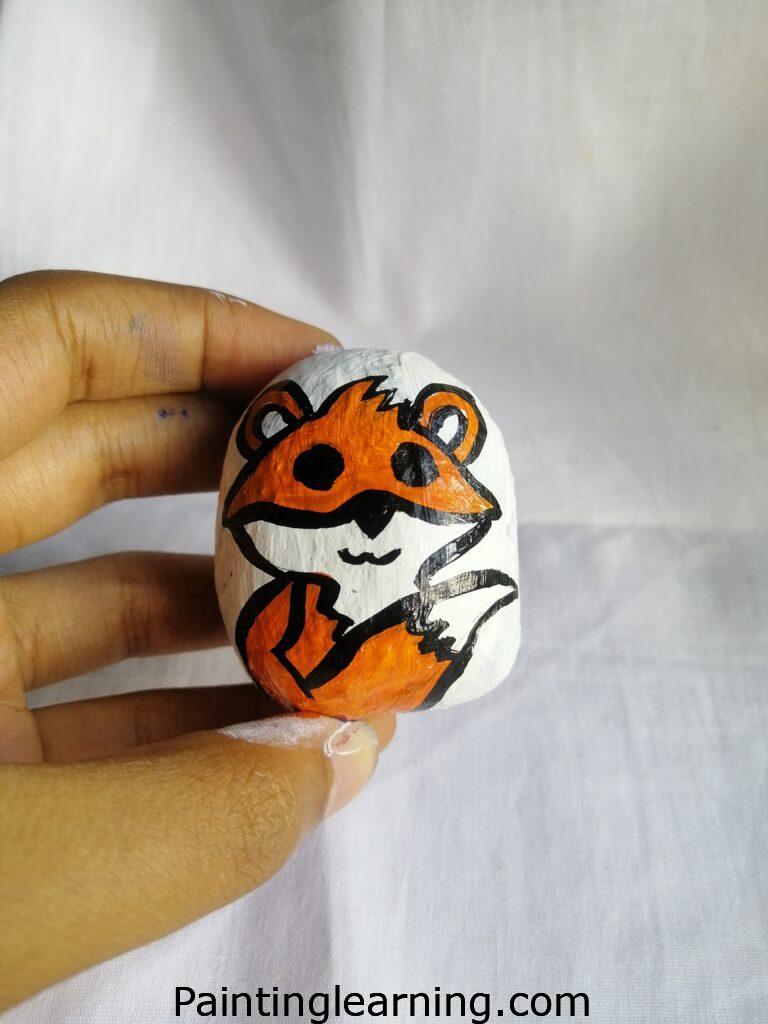
Here’s where your fox comes to life! Switch to your detail brush and black paint.
Start with the eyes. Paint two small oval shapes about one-third down from the top of the rock. Keep them proportional to your rock size.
Add the nose next. A small triangular shape at the pointed end of your rock works perfectly.
Paint the ear outlines. Two pointed triangular shapes at the top of the rock create those iconic fox ears.
Don’t forget the mouth! A small curved line beneath the nose gives your fox personality.
Step 4: Apply the Protective Varnish
Your fox is almost complete! Now for the final protective step.
Make sure your paint is completely dry. Any moisture will cause the varnish to look cloudy.
Using a clean flat brush, apply a thin layer of varnish over the entire painted surface. Work quickly but smoothly to avoid brush marks.
Let this dry according to the manufacturer’s instructions. Usually, it takes about 2-4 hours for full curing.
Your fox rock is now ready to display!
Tips for Success
I’ve learned these tricks through years of rock painting:
• Choose the right rocks: Smooth, flat stones work best. Avoid porous or rough textures that make painting difficult.
• Work in good lighting: Natural light helps you see colors accurately. If working indoors, use a bright lamp.
• Keep paint consistency: Add tiny amounts of water if paint feels too thick, but don’t make it runny.
• Layer your colors: Multiple thin coats look better than one thick application.
• Practice brush control: Steady hands create cleaner lines. Rest your painting hand on your non-painting hand for stability.
• Let each layer dry: Patience prevents muddy colors and smeared details.
Common Mistakes and How to Avoid Them
Mistake: Rushing the drying process Solution: Always wait for each layer to dry completely. Set a timer if needed.
Mistake: Using too much paint Solution: Start with less paint on your brush. You can always add more, but removing excess is harder.
Mistake: Painting on dirty rocks Solution: Clean your rocks with soap and water. Let them dry completely before painting.
Mistake: Skipping the base coat Solution: The white base coat makes colors vibrant and helps paint adhere better.
Mistake: Not sealing the finished piece Solution: Varnish protects your artwork from weather and handling damage.
Similar Variations You Can Create
Once you’ve mastered the basic fox design, try these fun variations:
• Arctic Fox: Use white and light gray instead of orange for a winter theme.
• Baby Fox Kit: Create smaller versions with proportionally larger eyes for a cute factor.
• Fox Family: Paint multiple rocks in different sizes to create a family group.
• Sleeping Fox: Paint the fox with closed eyes and a curled tail position.
• Geometric Fox: Use angular shapes and bold colors for a modern art approach.
• Seasonal Foxes: Add autumn leaves, winter snowflakes, or spring flowers around your fox.
Frequently Asked Questions
Q: What type of rocks work best for fox painting? A: Smooth, oval-shaped rocks about 3-4 inches long work perfectly. River rocks and beach stones are ideal.
Q: Can I use regular craft paint instead of acrylic? A: Acrylic paint is recommended because it’s weatherproof and adheres well to rocks. Regular craft paint may fade or peel.
Q: How long does the paint take to dry? A: Each layer typically dries in 30-60 minutes, depending on humidity and temperature. Full curing takes 24 hours.
Q: Do I need to prime the rock first? A: The white base coat acts as a primer. For very porous rocks, you might want to use an actual primer first.
Q: Can these rocks stay outside year-round? A: Yes, if properly sealed with varnish. The protective coating prevents weather damage.
Q: What if I make a mistake while painting? A: Let the area dry, then paint over it. Acrylic paint covers mistakes well when dry.
Conclusion
Creating Easy Fox painted rocks transforms ordinary stones into charming woodland art pieces. I’ve shown you the complete process, from gathering materials to applying the final protective seal.
The beauty of this project lies in its simplicity and the personal touch you bring to each piece. Whether you’re decorating your garden or creating gifts for friends, these fox rocks carry a special magic that brings smiles wherever they go. Now grab your brushes and start your own how to paint a Fox on a rock adventure!